OverviewNGUI comes with a small but powerful Tween library.

To add a tween to a widget, you can right click on it and choose the appropriate selection from the
Tween menu. Alternatively, or if you are not selecting a widget, you can go through the NGUI menu (NGUI -> Tween). Last but not least, you can also simply add the appropriate script by name, if you prefer.
Regardless of the route you take, once you add a tween to an object, that tween will be active by default, and as soon as you hit Play you will notice that the tween will be playing. If you don't want it to play right away, simply
disable the component by unchecking the checkbox next to the script name.
Although there are a variety of different tweens, they all inherit from the same base class (
UITweener) and have the same common functionality. They all have a
From and a
To fields representing the starting and final values. They also all have an
Animation Curve that lets you fine-tune how the values will interpolate from one to the other.
The
Duration field lets you specify how long it takes for the tween to fully animate, in seconds. You can also add a
Start Delay in case you don't want the tween to play right away. This value is also in seconds.
Tween Group lets you have several similar tweens on the same object, and trigger them selectively by matching the group ID.
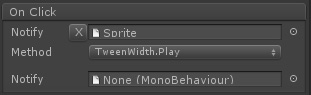
Now speaking of triggering tweens, you can do so manually by calling their Play() function by specifying the function in the OnClick section on the button, for example.
You can also take a more advanced route by attaching a
UIPlayTween script (Attach -> Play Tween Script). It gives a fair bit more options for you to play with.

First you will want to specify a
Tween Target. This will be the game object that will have the tween, or several tweens, that you will want to trigger. You can also optionally make it activate tweens on all child objects by marking the
Include Children option.
Like in the actual tween above, the
Tween Group field lets you be selective about which tweens you will trigger.
Trigger condition lets you specify what kind of action will trigger the tween to play.
Play direction lets you choose which way it will play.
If the target is disabled, you can choose to activate it or let it remain disabled (This includes tweens that were marked disabled on purpose so they wouldn't play right away, in case you're wondering!)
If the tween is already playing you can choose to restart it from the beginning, have it continue from where it is, or have it restart only if it already finished playing. You can also have the tween disable the target
When finished -- a useful thing to do when you are using tweens to transition from one menu to another.
Finally, if you want to execute some remote function once the tween finishes playing, you can do so by dragging the targeted game object into the
Notify field and choosing the appropriate function from the list. Like all NGUI notifications it must be of "public void FuncName (void)" type, like this:
public void MyNotification ()
{
Debug.Log(UITweener.current.name + " has finished playing!");
}
- You can create a tween that goes from the beginning to the end and then returns to the beginning by adjusting the Animation Curve, making it be shaped like an inverted "U".
- You can have tweens trigger each other in a daisy chain by having one tween's OnFinished notification trigger another tween's Play() function.
- To create a tween via code, use its Begin() function like so:
TweenPosition.Begin(tweenGameObject, duration, targetPosition);